Sew Your Own Clothes | The Earth Tunic
Digging up inspiration from the past, to form a future we make ourselves.

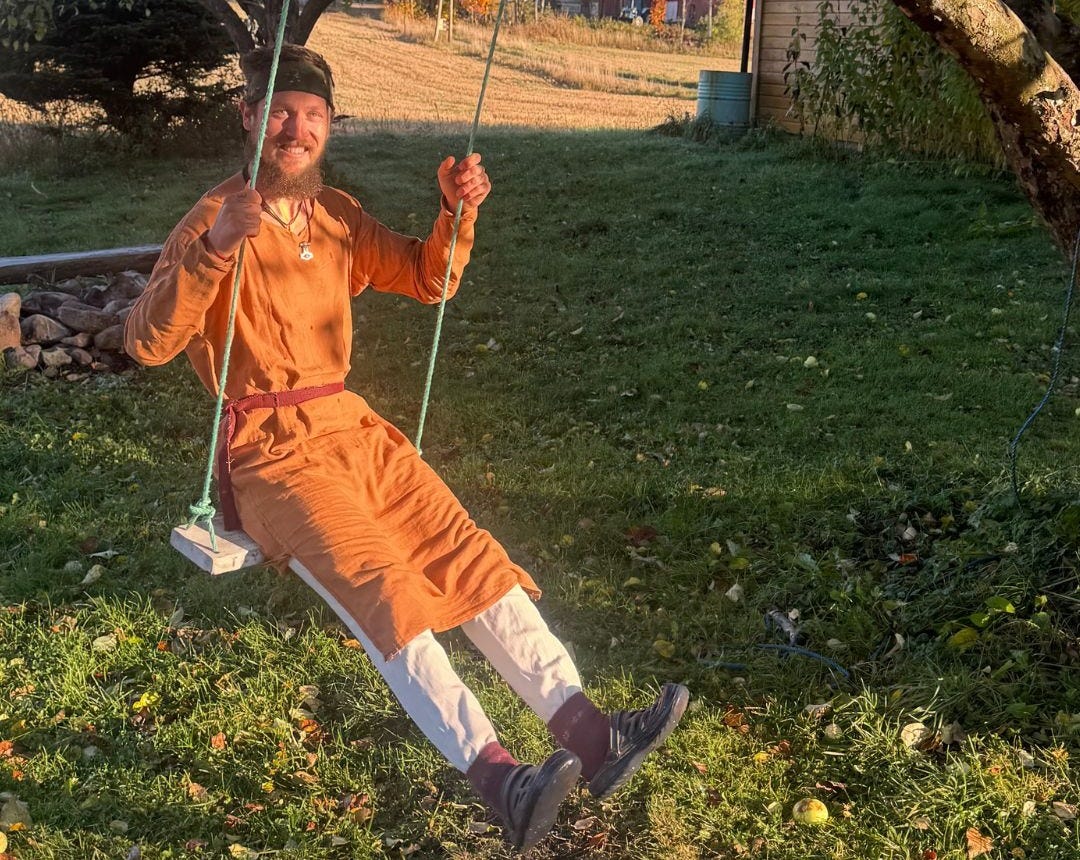
The Earth Tunic is inspired by the Viking and Medieval periods, where people wore longer garments that ended somewhere around the middle of the thigh. It had long sleeves, and I have made mine to have a bigger opening for the head. It was also customary to wear a belt around the waist, where other pockets and tools could be kept.
Don’t want to read? You are welcome to watch my measuring video “How To Measure The Earth Tunic | So It Fits Your Body Perfectly”.
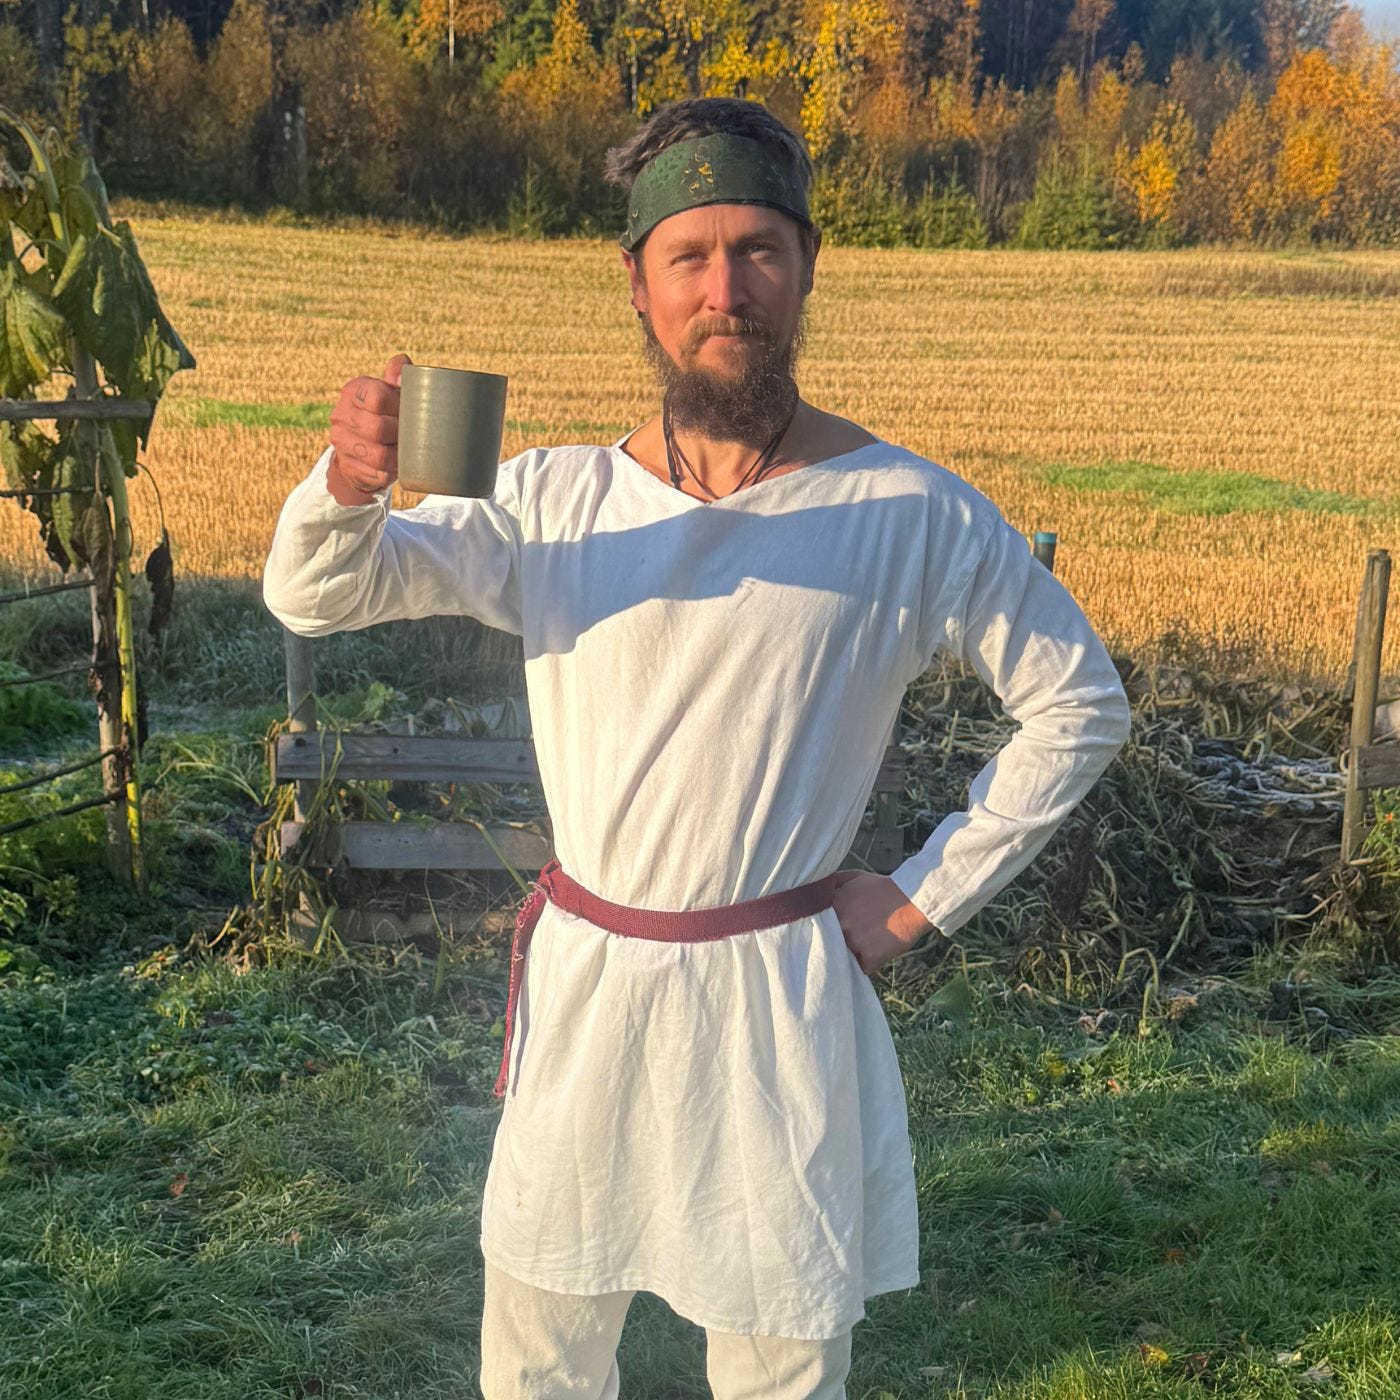
Here is an example of The Earth Tunic, which I have formed through many attempts to get the measurements right — regarding the width of the tunic and the sleeves. With the aim of creating a garment that I genuinely feel good wearing, and that looks nice when I see myself in the mirror.
The Double Stitch
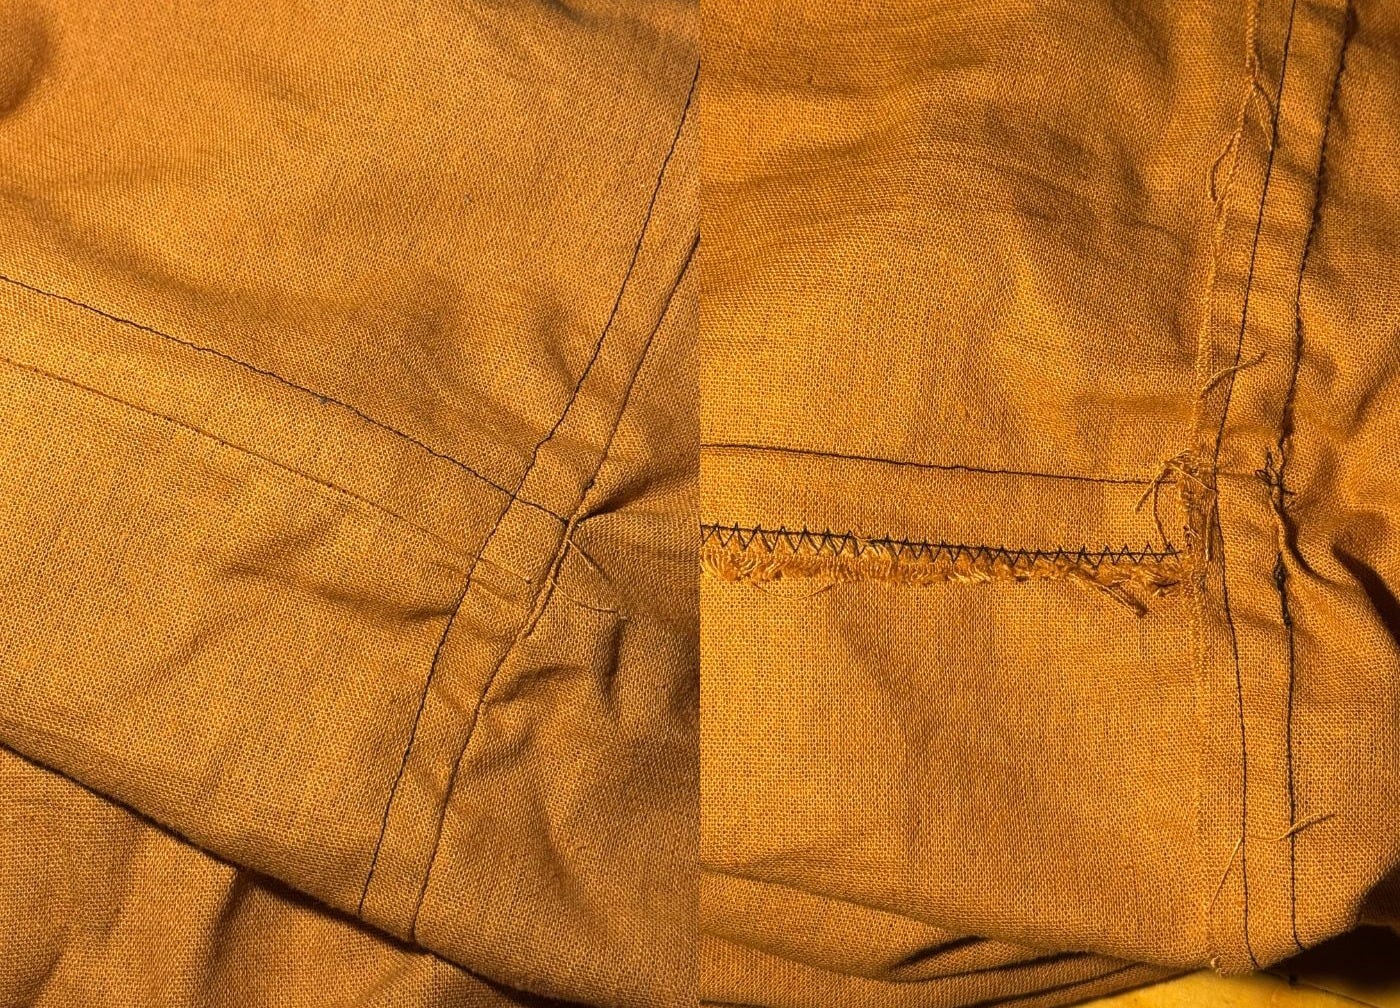
I have also developed my own way of stitching and am using something I call the double stitch, which you can see in the above image. This creates a sturdier end product, and it also has a good look to it. How I do it is that I use a 2 cm seam allowance and sew the first stitch on the 2 cm line. Then I fold it over to one side and sew the second stitch — creating the double stitch.
An important note on seam allowance
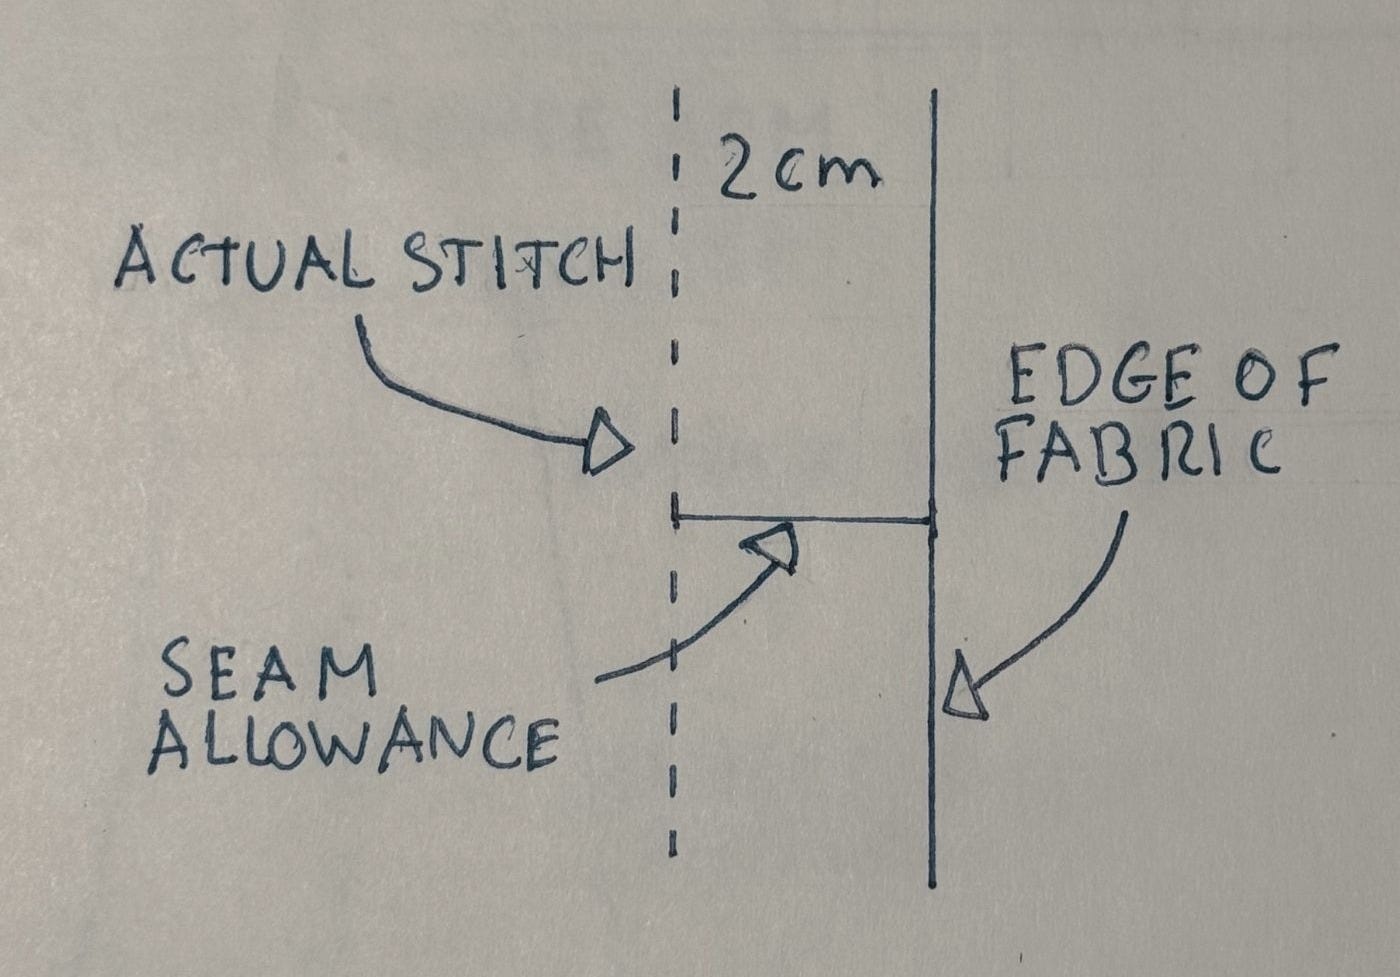
This term represents the amount of fabric that is “extra” after you have sewn. I work with a seam allowance of 2 cm. So what you do in practice is sew 2 cm in from the edge of the fabric. I use 2 cm to allow for the option to sew the double stitch, creating a more durable and nice-looking final product.
It is very important to add the seam allowance when you cut the pieces. Let us take the main body as an example. If you measure 60 cm for the width, from shoulder to shoulder, then you want to add 2 cm for seam allowance on both sides, ending with a final width of 64 cm. When you sew the pieces together, the end product will become 60 cm. If you did not add the seam allowance before cutting the pieces, you would end up with a final product that was 56 cm. Capisce?
This is a major mistake many make, and that I have also made. You forget the seam allowance, and poof! You end up with a smaller tunic than you had originally planned for. But hey! Everything is a learning journey. So don’t fret about making mistakes. Get up again, learn from them, and move forward. This is your mantra.
The Pattern
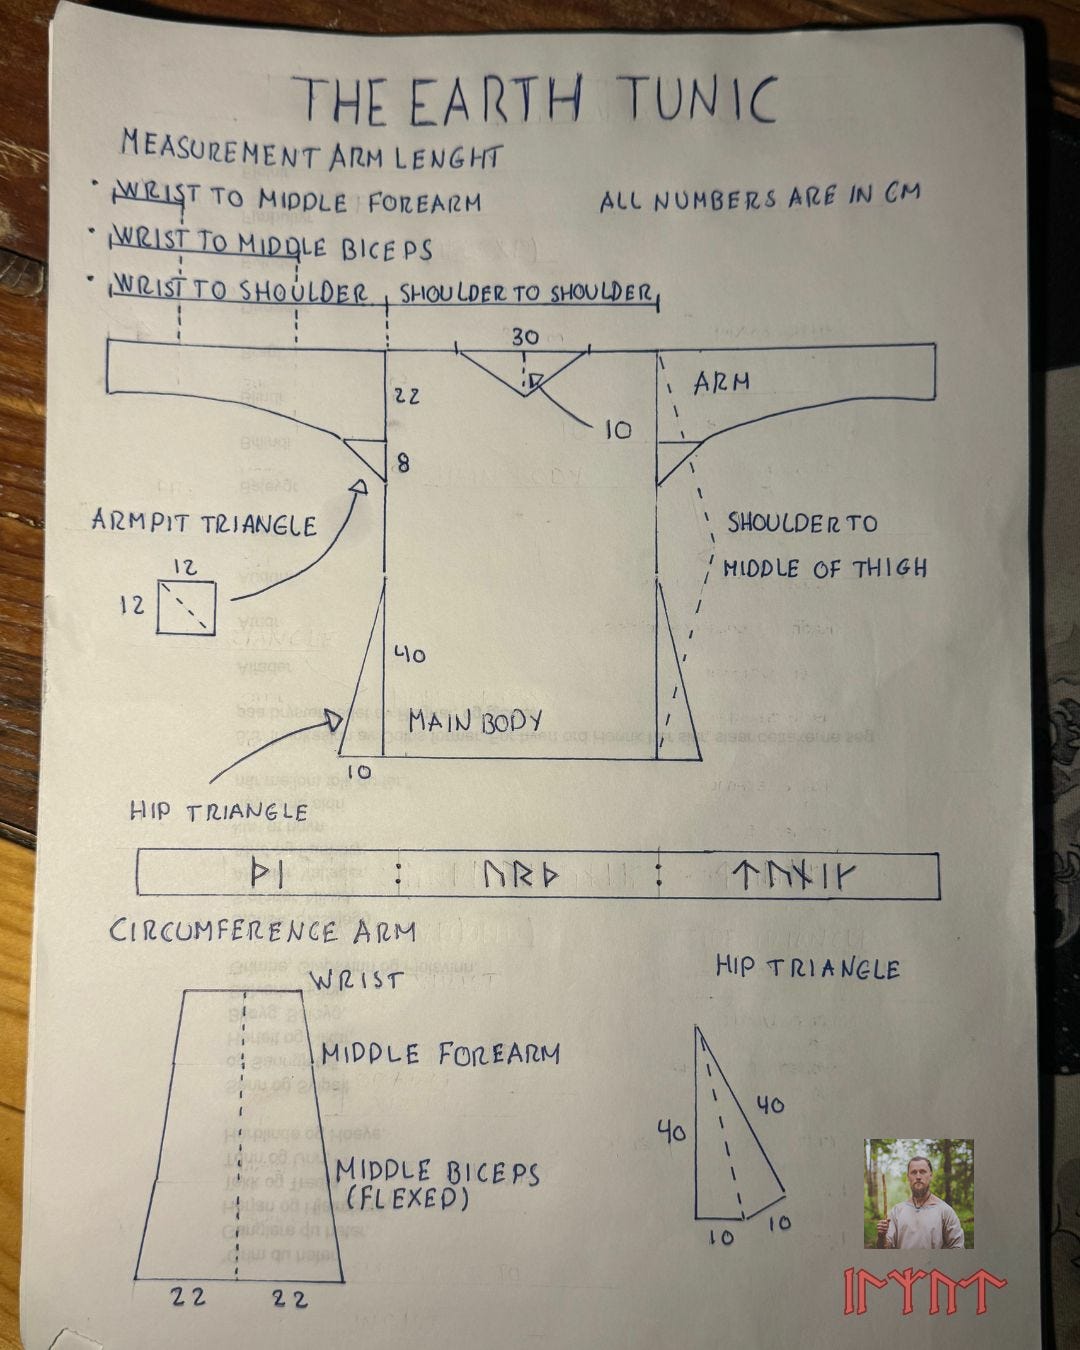
Each garment I make has a runic name, and in the Old Norse runic alphabet, “The Earth Tunic” is phonetically spelled “ᚦᛁ : ᚢᚱᚦ : ᛏᚢᚇᛁᚴ”. Each rune has a specific meaning, and so does this garment.
The pattern in and of itself contains four pieces. You have the main body, arms, armpit triangle, and hip triangle. I will now go over each piece and explain each one on its own, and then we will weave it all together at the end.
The Main Body
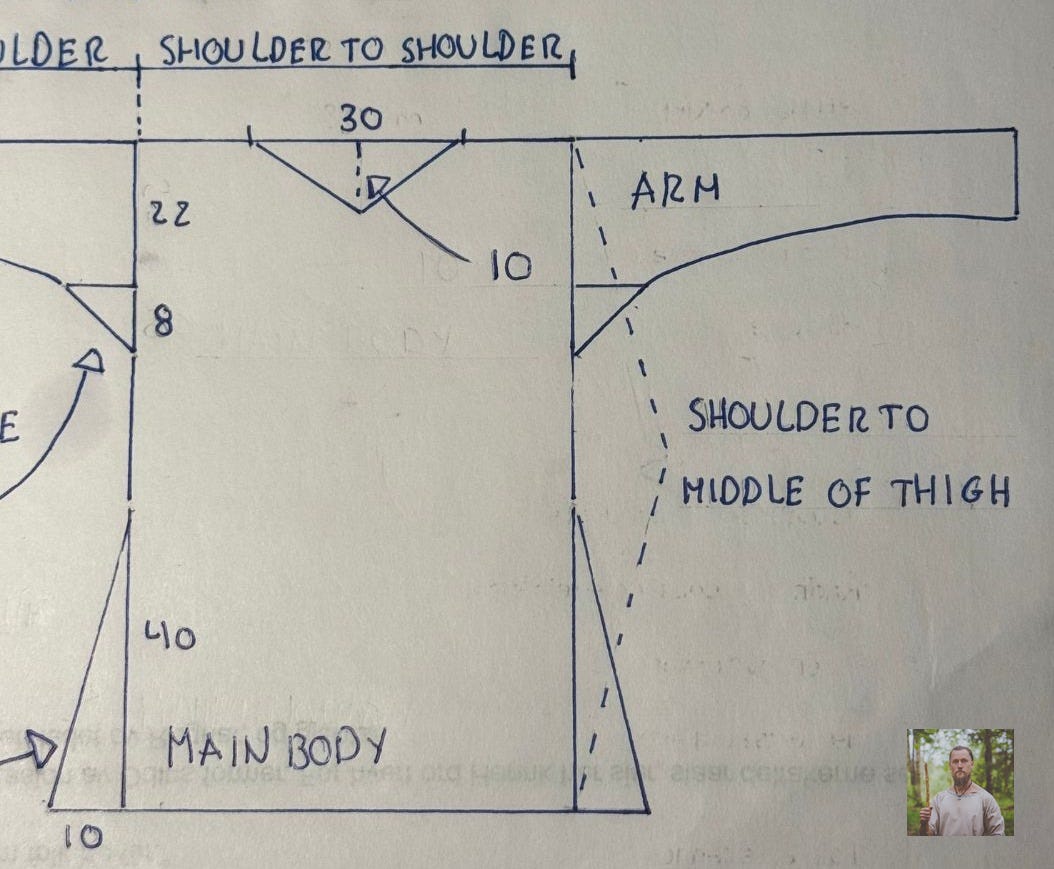
The main body is a simple rectangle that fits the body nicely. The first measurement is “shoulder to shoulder” at the top. This measurement depends on how wide your shoulders are, and it is important to get right. Lay your trusted measuring tape over the front of your neck, running from one end of the shoulders to the other, and measure 4 cm down from the point where each shoulder begins sloping towards the arm. The tunic fits very well when the main body covers a bit more than the very end of your shoulders, thereby adding the extra room.
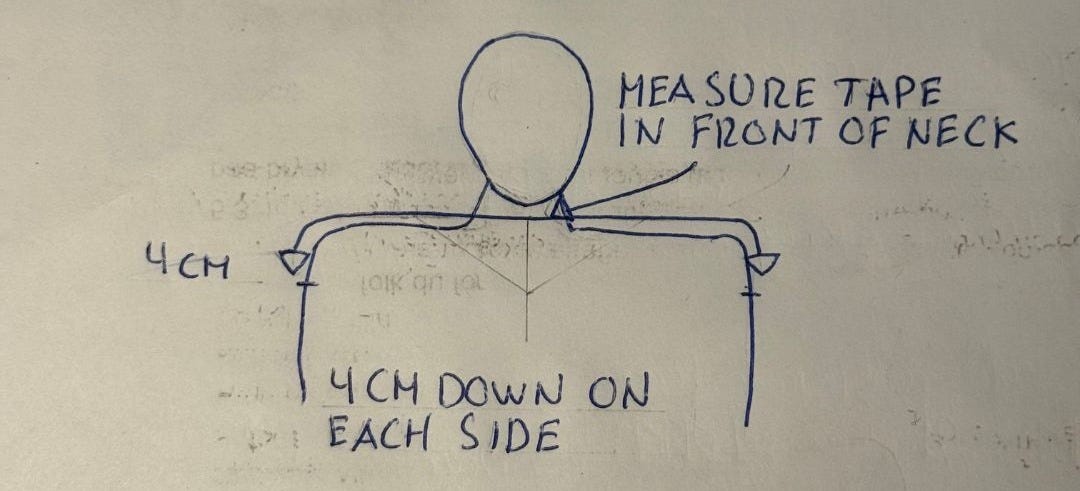
A general guide is to end with a distance between 60 – 70 cm. If you have wider shoulders, you might end up at 80+ cm. For a child, naturally, 60 cm and less is appropriate.
Next, you have “shoulder to middle of thigh.” You then want to measure the length from the top of your shoulder down to the middle of your thigh. This is for the length of the tunic. A general guide is about 90 – 100 cm, though it depends on how tall you are.
You cut two rectangular pieces for the main body: one that is going to be the front, and another that is going to be the back. Remember that the front piece will have the V-cut, which cuts about 10 cm down from the middle of the top edge.
The Sleeves
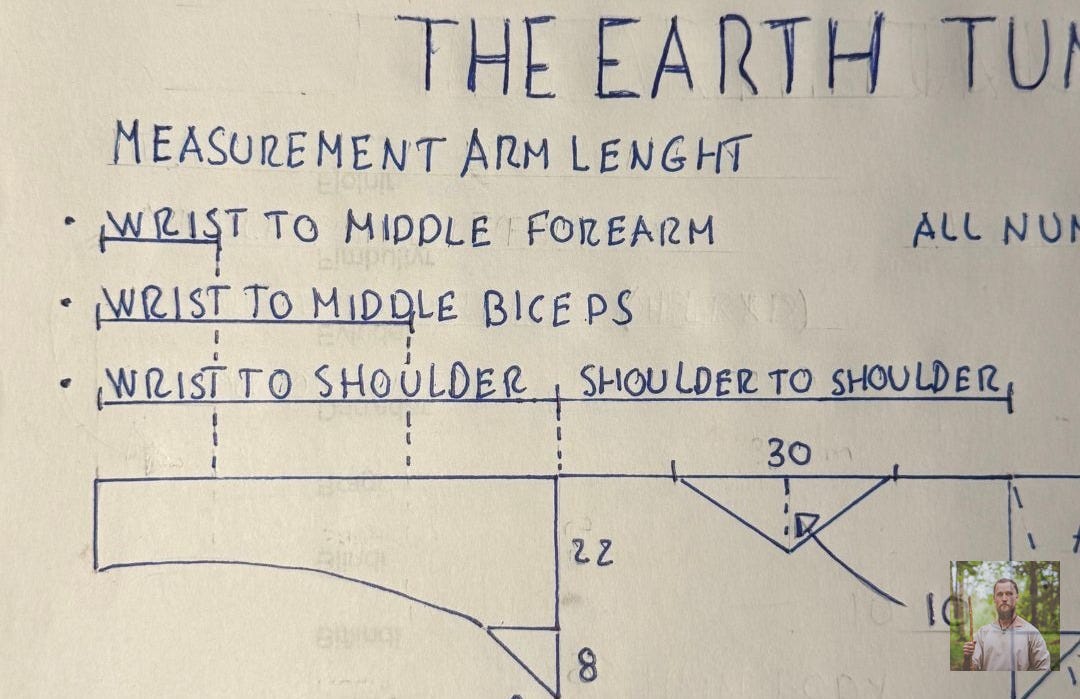
For well-fitting sleeves that are not too wide and not too narrow, it is important to get the correct length and circumference. I will now explain how this is done.
Let’s go over the measurement of the sleeve length first. First we have “wrist to middle forearm”: measure the distance from your wrist to the middle of your forearm. Then you have “wrist to middle biceps”: here you do the same, but to the middle of the biceps instead of the forearm. Last is “wrist to shoulder”: this is the length from the wrist all the way to the shoulder. This is the same point where you started measuring the distance between your shoulders — so about 4 cm down from the end of the shoulder, where it starts to slope towards the arm.
A typical distance for the whole arm is between 50 – 60 cm for adults. Keep all the measurements, because they are important when you are going to measure the circumference of your arm.
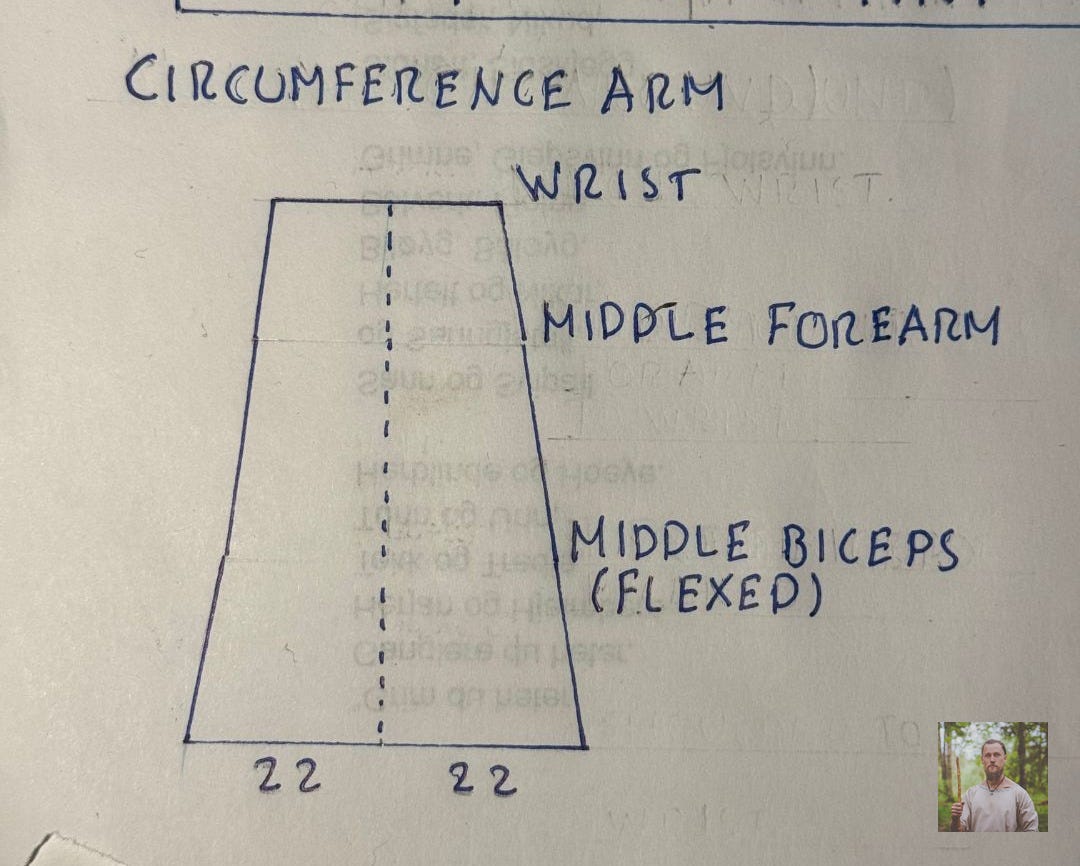
Now I guide you to the bottom left part of the pattern. Here we measure the circumference around three parts of the arm. We will measure the circumference around the wrist, middle forearm, and middle biceps (when it is flexed). So take your measuring tape and wrap it around each place, and measure the length around. It is important to slip one finger in between the measuring tape and your arm — this creates some extra space, so the final product breathes more naturally when you use it, instead of being very tightly squeezed to your arm. A “bad” tunic is one that is too tight and that hinders movement. That is not what we want.
You cut two identical pieces for the arms, which are folded over to create the final sleeve. The pattern is the bottom left part, called “circumference arm.”
The piece is cut at 44 cm in total — 22 cm on each side of the fold line. When it is folded over and sewn with the 2 cm seam allowance, the finished sleeve measures 22 cm across, lying flat. As we can see below, it pairs well with the armpit triangle, which will be added to the sleeve.
The Armpit Triangle
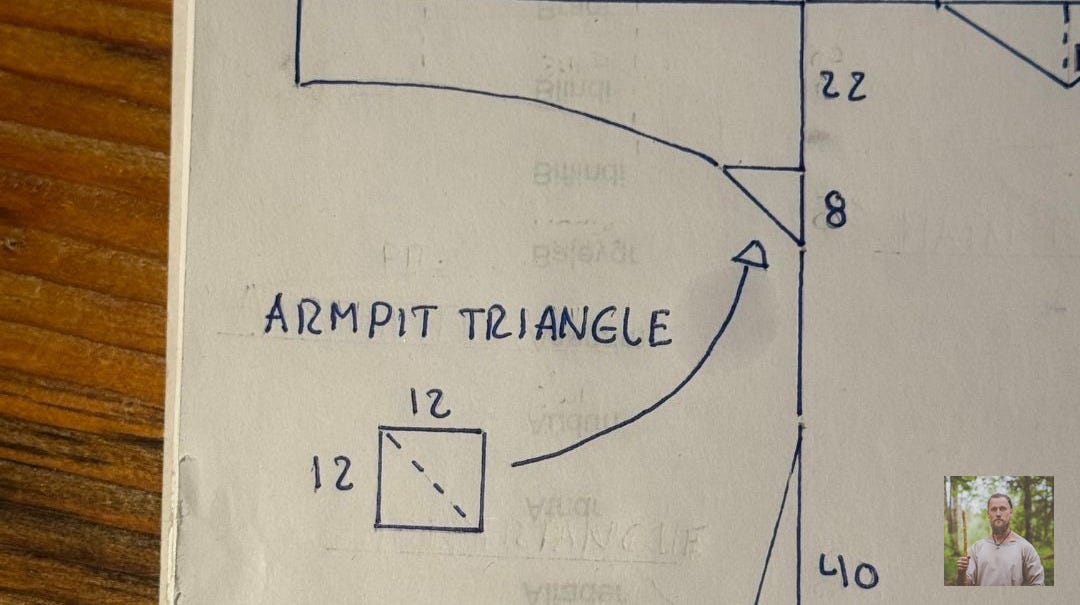
Historically, this piece is called a gusset, which is a triangular shape that was sewn into the armpit to give freedom of movement, adding extra space and room for the shoulder, chest, and arms. You simply cut two 12 × 12 cm squares, one for each armpit. Fold them diagonally to create a triangle, and then sew them into the seam where the sleeve meets the body, under the arm.
Important note: Here I have added in the 2 cm seam allowance, so the final length of the triangle will be 8 cm.
The Hip Triangle
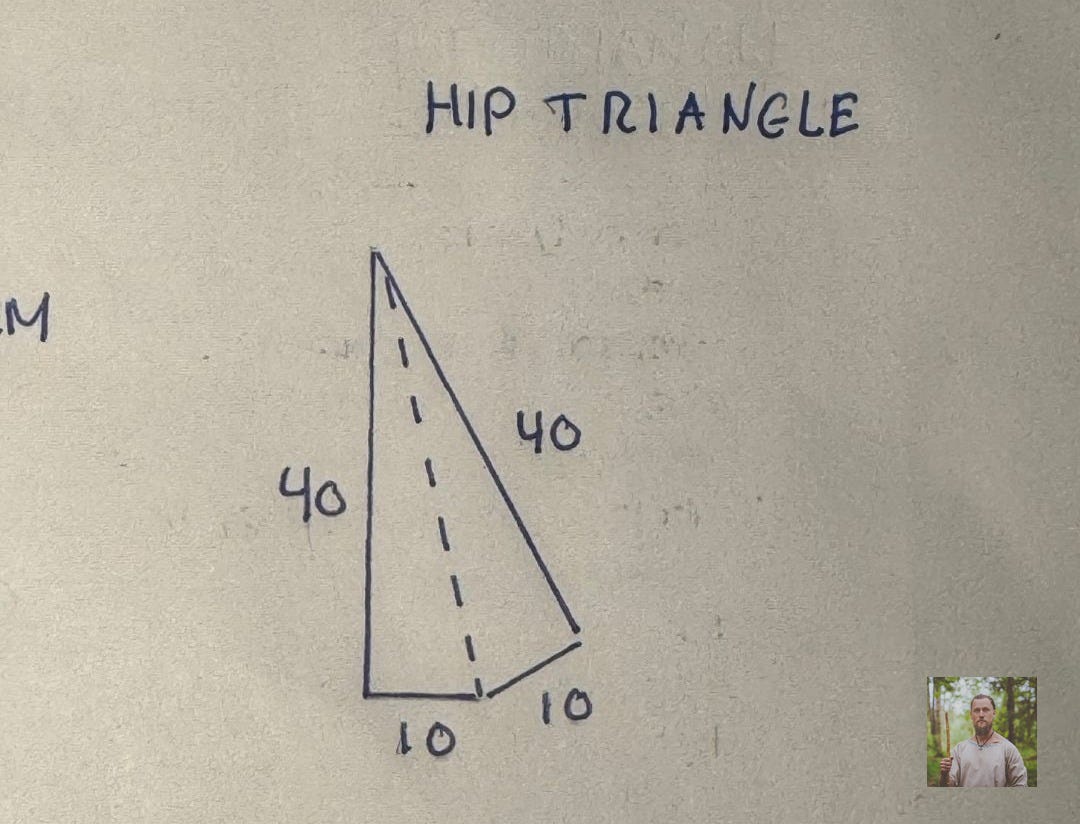
This is the final piece of the puzzle. This piece is a double triangle when laid flat, but seen from the side, it is a single triangle. You cut it as one piece, as a double triangle. How you do that is to make sure the measurements are correct. I would start by marking the first triangle, seen on the left side, and then measure the 40 cm and 10 cm so they connect nicely — giving you the exact angle you need, without actually knowing the angle.
General points about the tunic
I have burned some numbers into the pattern, which I will now offer a few words on. I have found that a fitting length for the neck is about 30 cm, which I feel looks cool. It is generally more open than “normal” t-shirts, but creates its own look. This is totally open to be made smaller or bigger — whatever you feel works for you. Don’t make it too wide, then it will just slide off a shoulder when you dance ecstatically around the roaring fire.
I have set the arms to be 22 cm where they connect to the main body, and with the extra 8 cm from the armpit triangle, it adds up to 30 cm. I feel that this is, in general, good enough space for my shoulders, chest, and arms to fit nicely. But if you are a very big Berserkr, then you might want to increase the width. I invite you to start with what the pattern says, and then expand from there.
I have also set the hip triangle to be 40 cm for the length and 10 cm for the width. I feel this is a good fit for this tunic. The wider it is, the more space you have for doing horse stance when you have your Natural Viking Berserkr Leg Workout.
Here’s a super tip. Before starting to sew, draw the whole pattern yourself on a piece of paper, and understand the different measurements before you start cutting. This makes the whole process further down much simpler. Understanding the why behind each measurement is much more important than being good at copy & paste — because then you develop your ability to think critically and come up with your own solutions, instead of relying on a pattern or other people.
I wish there was a video that showed me where and how to measure my Earth Tunic
Ah! You are in luck, because I have also made a video showcasing the tunic and how to measure it so you get a tunic that fits your body perfectly. I invite you to watch to increase your own understanding. So you in the end become more self-sufficient and less dependent.
Discussion about this post